今天来说phpmps获取并记录访客端口的方法,为什么要记录端口号,你懂的 此方法只用于 apache iis没测试过 本站是phpmsp2.1 2.3的应该也可以用,utf-8的格式 gbk的注意编码
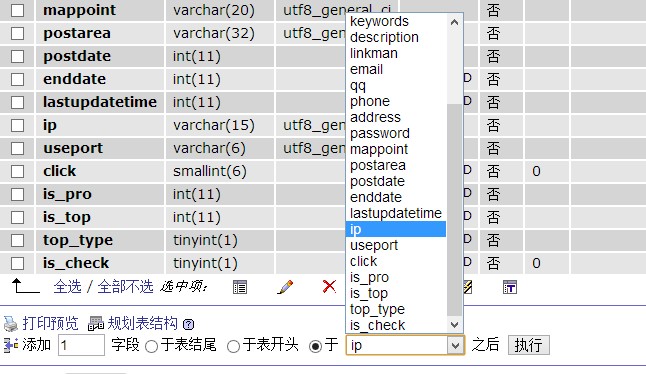
1、首先用phpmyadmin 在phpmps数据库 phpmps_info表 新建一个记录端口号的字段 我这里用 useport 表示端口号字段步骤看截图

登陆phpmyadmin 找到 phpmps_info表 在最下边有个添加字段 填 添加一个字段 于 ip字段之后 然后点执行,然后就看到了下面这幅图根据图片根据下面这幅图选择类型 整理什么的。

整理这栏自己看看自己的ip字段是选的什么 就选什么
2、在发布页post.php页面添加获取访客端口的函数
在post.php页面查找 require PHPMPS_ROOT . 'include/json.class.php';这行代码下面添加 这行代码 $useport = $_SERVER['REMOTE_PORT'];
查找$ip = get_ip();这行代码下面添加 这行代码 $useport = $_SERVER['REMOTE_PORT'];
查找
$sql = "insert into {$table}info (userid,catid,areaid,title,keywords,description,content,linkman,email,qq,phone,password,postarea,postdate,mappoint,address,enddate,ip,is_check,is_top,top_type)
values ('$userid','$catid','$areaid','$title','$keywords','$description','$content','$linkman','$email','$qq','$phone','$password','$postarea','$postdate','$mappoint','$address','$enddate','$ip','$is_check','$is_top','$top_type')";
这行代码 红色的两个函数后面分别添加 useport $useport 两个函数。
以下是添加后的代码
$sql = "insert into {$table}info (userid,catid,areaid,title,keywords,description,content,linkman,email,qq,phone,password,postarea,postdate,mappoint,address,enddate,ip,useport,is_check,is_top,top_type)
values ('$userid','$catid','$areaid','$title','$keywords','$description','$content','$linkman','$email','$qq','$phone','$password','$postarea','$postdate','$mappoint','$address','$enddate','$ip','$useport','$is_check','$is_top','$top_type')";
这样就把获取到的访客端口号记录到数据库了,接下来就是在网站后台查看每条信息发布者的 ip和端口号
3、在网站admin/templates目录找到 left.htm 文件 查找
<li id="m2_5" ><a href="ver.php" target="right">问题验证</a></li>
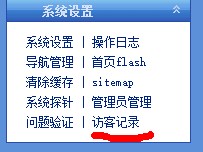
改成: <li id="m2_5" ><a href="ver.php" target="right">问题验证</a> | <a href="fangke.php" target="right">访客记录</a></li>
修改后是这样的见下图

ps:2.3的问题验证好后面好像是地图什么来着 可以把访客记录填在下一行这个自己修改吧
然后回到admin目录复制一个 info.php 改名为 fangke.php
打开fangke.php 查找 include tpl('view_info'); 改成 include tpl('fangke');
查找 while($row=$db->fetchRow($res)) 找到以下代码
while($row=$db->fetchRow($res))
{
$arr['id'] = $row['id'];
$arr['title'] = cut_str($row['title'],'10');
$arr['postdate'] = date('Y-m-d', $row['postdate']);
$arr['is_pro'] = $row['is_pro']>time()? '是' : '否';
$arr['is_top'] = $row['is_top']>time() ? '是' : '否';
$arr['is_check'] = $row['is_check']==1 ? '是' : '否';
$articles[] = $arr;
}
改成
while($row=$db->fetchRow($res))
{
$arr['id'] = $row['id'];
$arr['title'] = cut_str($row['title'],'10');
$arr['postdate'] = date('Y-m-d', $row['postdate']);
$arr['is_pro'] = $row['is_pro']>time()? '是' : '否';
$arr['is_top'] = $row['is_top']>time() ? '是' : '否';
$arr['is_check'] = $row['is_check']==1 ? '是' : '否';
$arr['ip'] = $row['ip'];
$arr['useport'] = $row['useport'];
$articles[] = $arr;
}
保存上传
然后回到admin/templates目录新建 fangke.htm 文件
复制以下代码,上传就可以了
<html>
<head>
<meta http-equiv="Content-Type" content="text/html; charset=<?=$charset?>">
<script type="text/javascript" src="../include/calendar.php"></script>
<link rel="stylesheet" rev="stylesheet" href="../include/calendar/calendar.css" type="text/css" media="all" />
<link href=images/style.css rel=stylesheet type=text/css>
<script language="JavaScript" src="js/common.js" type="text/javascript"></script>
<body>
<br>
<table width=100% height="28" border=0 align=center cellpadding=0 cellspacing=1 class=tableborder>
<tr class=header>
<form name="form1" method="post" action="info.php">
<td height=25> 分类:
<select name="cat" id="cat">
<option value="0">请选择分类</option>
<?echo $cats?>
</select>
地区:
<select name="area" id="area">
<option value="0">请选择地区</option>
<?
echo $area;
?>
</select>
类型:
<select name="type" id="type">
<option value="0">请选择类型</option>
<option value="1">已审核信息</option>
<option value="2">未审核信息</option>
<option value="3">推荐信息</option>
<option value="4">置顶信息</option>
</select>
关键字:
<input name="keywords" type="text" id="keywords">
<input name='act' type="hidden" value="list">
<input name="submit" type="submit" id="submit" value=" 搜 索 ">
</td>
</form>
</tr>
</table>
<br>
<table width=100% border=0 align=center cellpadding=0 cellspacing=1 class=tableborder>
<tr class=header>
<td height=25> 发布信息者IP端口记录列表</td>
</tr>
<tr>
<td bgcolor=#FFFFFF align=center><table width=100% align=center border=0 cellspacing=1 cellpadding=0 bgcolor="#DBEAF5">
<form name="form" action="" method=post>
<tr bgcolor=#CED4E8 align="center">
<td width="14%" height=25> 编号</td>
<td width="32%" bgcolor="#CED4E8">文章标题</td>
<td width="13%" bgcolor="#CED4E8">发布时间</td>
<td width="27%">ip地址</td>
<td width="14%">端口</td>
</tr>
<?php
foreach($articles AS $row)
{
?>
<tr bgcolor=#FFFFFF align=center>
<td><input name="id[]" type="checkbox" id="id[]" value="<?=$row[id]?>" /><?=$row[id]?></td>
<td align=left> <a href="../view.php?id=<?=$row[id]?>" target="_blank" title="浏览前台信息"><?=$row[title]?></a></td>
<td><?=$row[postdate]?></td>
<td><?=$row[ip]?></td>
<td><?=$row[useport]?></td>
</tr>
<?}?>
<tr align=center>
<td height="26" colspan="7" align="left" bgcolor="#CED4E8">
<input name="checkall" type="checkbox" id="checkall" onClick="CheckAll(this.form)"/>
<select name="type" id="type" >
<option value="0">请选择操作</option>
<option value="is_check">审核通过</option>
<option value="delete">删除</option>
</select>
<input type="hidden" name="act" value="batch">
<input type="submit" name="submit2" id="submit2" value=" 确 定 " onClick="if(!confirm('确定要操作吗?\n\n此操作不可以恢复!'))return false;">
<? include tpl('page');?></td>
</tr>
</form>
</table></td>
</tr>
</table>
</body>
</html>
到这里就大功告成了 可以自己发个测试下 点击访客记录就看到下面的了

赶紧试试吧!写了半个小时 我擦 转载请注明出处……
评论列表: